Get Started
Install the brain
This Guide assumes you intend to use docker and docker-compose to run the framework. If you would like to install the brain using a node runtime, see the Install page.
- Create an empty folder called "Arachne":
mkdir arachne && cd arachne. - Clone this repository:
git clone https://github.com/InTechSA/arachne-bot-framework. - Create a new
docker-compose.ymlfile in the "arachne" folder:nano docker-compose.ymlcontaining:
version : "2"
services:
  brain:
    build: ./arachne-bot-framework
    ports:
      - "${BRAIN_PORT}:80"
    environment:
      - MONGO_URL=${MONGO_URL}
      - HOST=${BRAIN_HOST}
      - PORT=80
      - ADMIN_USER=${ADMIN_USER}
    networks:
      - botnetwork
    depends_on:
      - mongo

  mongo:
    image: mongo:3.4.0
    restart: on-failure
    volumes:
      - db-data:/data/db
    networks:
      - botnetwork
    command: mongod --smallfiles --oplogSize 128

networks:
  botnetwork:

volumes:
  db-data:
This will be the file docker-compose uses to instanciate the mongodb database used by the brain. It will automatically link the brain to the database. If you further need to backup the database, it will be accessible in the
db-datavolume created by Docker.
- Create a
.envfile wich will define the following variables (setADMIN_USERto whatever you want):
###
# BRAIN
###
# Url of the brain.
MONGO_URL=mongodb://mongo:27017/brain
BRAIN_HOST=0.0.0.0
BRAIN_PORT=3012
ADMIN_USER=Nakasar
- Run
docker-compose up -d. - Go the http://localhost:3012/, you should access the brain main endpoint.
- Go to http://localhost:3012/setup, to create the admin user.
- Go to http://localhost:3012/dashboard, and login using the
ADMIN_USERvalue as username, andPassword0as password. - Modify your password in the account page http://localhost:3012/dashboard/settings.
Plug in a NLP service.
It is optionnal, yet it recommended to use a NLP service. You may use RECAST.ai, WIT.ai, or any other solutions (icluding your own!). Follow these steps to plug in a NLP service:
- Log in the dashboard (base account should be
ADMIN_USERvalue &Password0). - Navigate to the Skills tab and in the nlp Skill click the edit skill icon.
- In the edition tab, click Configure secret.
- In the openned modal, add a new secret named
recastai_token, or whatever your NLP provider requires. - If you intend to use RECAST.ai, you are done. Go back to the *Skills tab and activate the nlp Skill.
- If not, you will have to edit the nlp skill code to send a http request to your NLP provider. The nlp skill must have an
analyzecommand that returns a Promise to the following object:
{
    intent: 'weather',
    entities: {
        location: [
            "Kayl, LU",
            "Paris, FR"
        ],
        datetime: [
            "tomorrow"
        ]
    }
    message: 'I think your intent is intent-slug!'
}
Authorize the Dashboard to test the bot
All adapters, including the Dashboard, must by authorized by the brain and use their unique token.
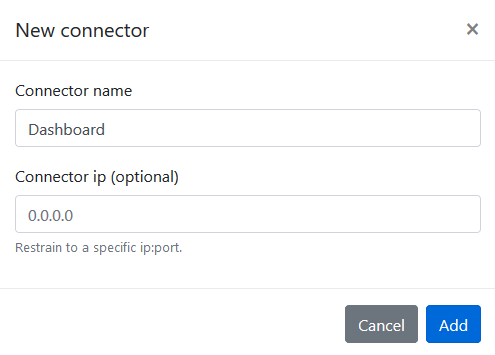
- Navigate to the Connectors tab.
- Click Add Connector.
- Enter
Dashboardas the name of the connector, then click Add.

Test your NLP service
Now that you have an active NLP service and that you authorized the bot, let's test your bot !
- Navigate to the Dashboard tab.
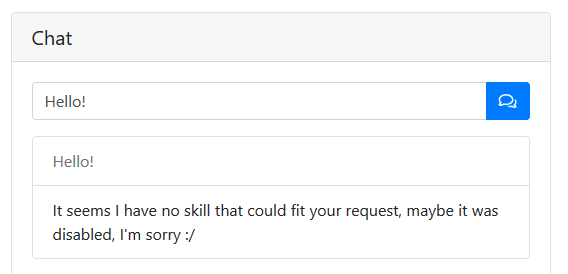
- In the chat sandbow, enter some message like "Hello!".
- You should have an answer from the brain that is not an "error with nlp endpoint".
Correct:
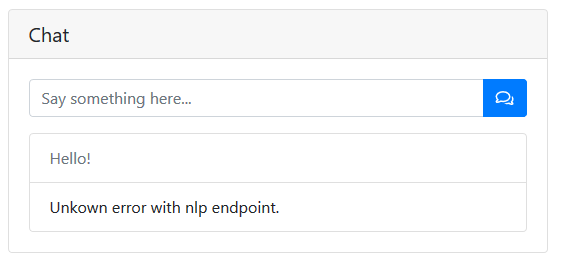
 Error:
Create your first Skill
Let's create a new skill from scratch !
- Navigate to the Skills tab.
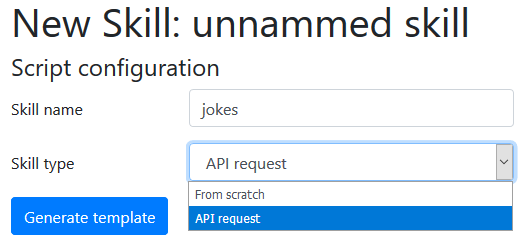
- Click *New Skill.
- Give a name to your new skill, let's add a "jokes" skill that will query fun jokes from an external API.
- As we will query an external API, select "API request" as the Skill's type.
- Click Generate template.

- Welcome to the Skill Edition Mode. Here, you can edit the code of your skill. (And must save it before configuring it.) You have to keep the template or your skill will not save.
- As you may see, because you selected the "API Request" type, you already have the request library listed as a dependency. Let's require it. All you code will be in the
<SKILL LOGIC>section:
/* <SKILL LOGIC> */
const request = require('request');
/* </SKILL LOGIC> */
- Our skill will have to respond the the
!jokecommand. Click the Add command tool and give a name to the command, let's call itsay-a-joke. The command will be what users will type, writejoke. And we will give a nice name to our function, likesayJoke. Click Add command, and the editor will create a new template for you, and add the command declaration to the top of the file.
/* <SKILL COMMANDS> */
let commands = {
  'say-a-joke': {
    cmd: "joke",
    execute: sayJoke
  }
};
/* </SKILL COMMANDS> */

/* <SKILL LOGIC> */
const request = require('request');

/**
  Handler for command say-a-joke (!joke).

  Params :
  --------
    phrase: String
*/
function sayJoke({ phrase, data }) {
  return new Promise((resolve, reject) => {
    /*
      >>> YOUR CODE HERE <<<
      resolve the handler with a formatted message object.
    */
    return resolve({
      message: {
        title: "Not implemented",
        text: "This functionnality is currently not implemented."
      }
    });
  });
}
/* </SKILL LOGIC> */
- Edit the content of the sayJoke function to call your joke service:
function sayJoke({ phrase, data }) {
  return new Promise((resolve, reject) => {
    request({
        method: "GET",
        url: "https://myjokeservice.lu/joke",
        callback: (err, res, body) => {
            return resolve({
                message: {
                    title: "A fun joke",
                    text: body.joke.text
                }
            });
        }
    });
  });
}
- Save you Skill by clicking the Save icon. Your Skill is now up, and you may run it by toggling the red pill near its name in the *Skills tab.
- You may edit your skill and configure its secrets (let's say, if your API require authentification).